

Checklist for Inclusive Training Design
Want to make your training accessible to everyone? Start here. Designing training programs that work for all learners - regardless of their abilities, language skills, or backgrounds - requires thoughtful planning. This guide breaks down the essentials:
- Clear Objectives: Define what learners will achieve, not just the topics you’ll cover. Use plain language and measurable goals.
- Accessible Materials: Use formats like Word or HTML instead of PDFs, ensure screen-reader compatibility, and maintain proper color contrast (4.5:1 for text).
- Flexible Content Delivery: Provide text, audio, and video options with captions and transcripts. Avoid autoplay media.
- Bias-Free Content: Use diverse names, scenarios, and perspectives. Avoid stereotypes and jargon.
- Interactive Activities: Ensure tools like polls or whiteboards meet accessibility standards. Offer multiple ways for learners to engage.
- Support Systems: Address accommodation needs early, maintain privacy, and provide clear contact points for help.
Accessibility in Action: Inclusive Design for Every Learner
Course Structure and Planning
Before diving into content creation, take the time to map out learning outcomes, access methods, and communication channels. This approach helps avoid confusion and ensures that learners can engage with the material right from the start. A key part of this process is defining clear, actionable learning objectives to guide the course design.
Setting Clear Learning Objectives
Learning objectives should focus on what students will do and understand by the end of the course, rather than simply listing topics to be covered [7][8]. Using plain, straightforward language makes these objectives easier for students to grasp before training begins [5][4]. For instance, instead of writing, "Understand API integration paradigms", try, "You will connect two software applications using an API and test the data flow."
"The syllabus provides a roadmap for the course, indicating what students will know and be able to do by the end of the class." - MIT Teaching + Learning Lab [7]
Make objectives measurable and allow for flexibility in how learners demonstrate their mastery. For example, some students might prefer to showcase their understanding through a written report, while others might opt for a presentation or a diagram. The key is the outcome, not the format [5]. Linking objectives to practical, real-world scenarios or career goals can greatly enhance engagement, particularly for students from historically underserved communities [5]. To tailor the course to your audience, consider using a pre-course survey to assess their current knowledge and adjust materials accordingly [5].
Creating an Accessible Syllabus
The syllabus serves as the foundation for the training experience, so it’s important to make it welcoming and easy to navigate. Shift the focus from content-centered language like "the course will cover" to student-centered phrases such as "you will learn." This small change can make a big difference in fostering a sense of inclusion [9][5].
To ensure accessibility, organize the syllabus with clear headers and logical sections. This structure benefits everyone, whether they’re skimming visually or using assistive tools like screen readers [9][11]. Choose digital-friendly formats like Microsoft Word, Google Docs, or HTML instead of PDFs, as these are more compatible with assistive technologies [2][9][11].
Other accessibility tips include:
- Maintaining a color contrast ratio of at least 4.5:1 for standard text and 3:1 for larger text [2].
- Using sans-serif fonts and keeping paragraphs short (2-4 sentences) to support learners with dyslexia or visual impairments [11][6].
- Adding text labels or symbols alongside color coding to ensure meaning isn’t lost for those with color blindness [2][6].
Publish the syllabus early to allow time for requests for alternative formats [5]. Define acronyms and technical terms before using them, and present schedules in tables with clear headers to improve readability [9][6]. Once the syllabus is ready, it’s time to outline a communication plan.
Building a Clear Communication Plan
Effective communication is critical for a smooth learning experience. Clearly define the channels you’ll use for announcements (like email or a learning management system), set expectations for response times (e.g., a 24-hour turnaround for emails), and provide contact information for technical support. This clarity can be especially reassuring for first-generation learners who might be unfamiliar with academic norms [5][10].
Address accessibility needs early by including questions about screen readers, hearing loops, or medical break requirements in registration forms. Share slides, handouts, and reading materials ahead of time so participants using assistive technologies or in different time zones can prepare. Even small changes, like renaming "office hours" to "Student Hours" or "Drop-in Hours", can make these sessions feel more approachable [5].
Set clear guidelines for respectful online interactions. This includes using correct names and pronouns and outlining netiquette for chat and video discussions. During live sessions, always repeat audience questions or comments into the microphone to ensure remote participants and captioners can follow along. Mid-training surveys can also be a valuable tool for identifying and addressing communication issues before the course concludes.
Content and Materials Design
Creating materials that reflect a wide range of learner identities and experiences is essential. This involves eliminating bias, incorporating diverse perspectives, and using visuals and language that resonate with everyone - whether they’re present in person or engaging online.
Removing Stereotypes and Bias
Carefully review content to ensure it doesn’t perpetuate outdated gender roles or cultural stereotypes. Use names and scenarios that represent a variety of racial and ethnic backgrounds, gender identities, sexual orientations, ages, and abilities [5]. For instance, instead of always depicting "John" as the engineer and "Mary" as the assistant, mix up roles and identities in your examples. Shift away from "deficit thinking", which focuses on what learners lack, and embrace asset framing to highlight their strengths and potential [5].
"Instructor biases and attitudes can manifest as stereotyping or microaggressions. Try to avoid deficit thinking and instead, use asset framing to focus on student potential."
– University of Nebraska-Lincoln [5]
Language plays a big role here, too. Spell out acronyms, jargon, and technical terms before using them, and steer clear of idioms that might confuse international or neurodiverse learners [4][5]. For inclusivity, replace specific terms like "click" with broader ones like "activate", especially for learners who don’t use a mouse [6]. If discussions become tense, consider mindfulness reflection protocols to uncover and address any of your own biases or unintended microaggressions [5].
Including Different Perspectives
Beyond removing bias, it’s important to actively include diverse viewpoints. Use course materials - like readings, videos, and case studies - created by individuals from historically underrepresented or varied backgrounds [5]. Doing this not only enriches your content but also shows learners that their perspectives are valued. Avoid metaphors tied to U.S.-specific references (such as holidays, sports, or politics) to ensure international learners can connect [5]. When explaining concepts, present multiple cultural or historical viewpoints instead of focusing on just one. For example, a lesson on project management could include methodologies from different regions and industries, not just those popularized by Silicon Valley.
Cost is another factor to consider. Avoid requiring expensive textbooks and explore Open Educational Resources (OER) to reduce financial barriers [2]. Additionally, be mindful of learners outside the U.S., as certain topics or digital tools may be restricted or sensitive in their countries [2].
Selecting Appropriate Visual and Text Content
Visuals and text should align with the inclusivity principles outlined above. Choose clear, high-quality images and include meaningful alternative text (alt-text) to ensure the same information is accessible to those using screen readers [13][14]. For complex visuals like charts, provide a concise alt-text summary and a detailed explanation within the text [14].
For readability, use sans serif fonts like Arial, Calibri, or Verdana in 12–14pt size with 1.15–1.5 line spacing [13][14]. Avoid all-caps for emphasis, as screen readers might spell out letters individually, and use underlining only for hyperlinks [13][14]. Ensure text has a contrast ratio of at least 4.5:1 (or 3:1 for larger text) [2][1]. Don’t rely solely on color to convey meaning; add icons or labels for clarity [2][13]. Also, avoid saturated reds, as they can trigger health issues for individuals with epilepsy or traumatic brain injuries [6].
During live presentations, describe all key visual elements verbally (e.g., "About half the audience raised their hand") so that visually impaired participants or those listening to audio-only versions receive the full context [4]. Finally, use built-in heading styles (like Heading 1 and Heading 2) to organize your content logically, allowing assistive technologies to navigate it more effectively [13][14].
Delivery Methods and Learning Activities
Delivery methods play a key role in effective learning. The Universal Design for Learning (UDL) framework focuses on three main principles: offering multiple ways to engage learners (the "why"), presenting information in diverse formats (the "what"), and allowing flexible methods for action and expression (the "how") [3]. By adopting this approach, educators can ensure that learners with varying abilities, preferences, and backgrounds can fully participate. The goal is to diversify teaching methods so that no single approach becomes an obstacle, building on earlier planning to make learning accessible to everyone.
Using Multiple Teaching Methods
Incorporate a mix of individual, group, and whole-class activities to address different learning preferences [5]. For example, independent tasks can benefit learners who need quiet reflection or prefer working solo, such as those with social anxiety. Meanwhile, small group activities, like breakout sessions, encourage collaboration and shared problem-solving [3]. Whole-class discussions or lectures can provide a sense of community while delivering core concepts, especially when paired with interactive elements like Q&A sessions. This variety ensures that every learner has a pathway to engage effectively.
Scaffolding is another strategy that helps learners absorb information more easily. Start with an overview of the session's objectives, then dive into the material, and wrap up with a summary of key points [4]. This structured approach is particularly helpful for individuals with cognitive disabilities or those who need extra time to process new ideas. Include frequent pauses to give participants time to form questions or reflect without feeling rushed [4]. Avoid rigid time constraints for activities, as some learners may need additional time to use assistive tools or carefully think through their responses [5][1].
Adding Hands-On Learning Activities
Interactive methods like role-playing or "learning by doing" can boost retention, but accessibility must remain a priority. For instance, virtual tools like sticky notes or drag-and-drop features might not work well for participants using keyboards or screen readers [4][6]. Before incorporating third-party tools like polling apps or interactive whiteboards, confirm they meet WCAG 2.1 AA standards to ensure compatibility with assistive technologies.
Use inclusive language in instructions - swap "click" with "activate" to better accommodate participants using keyboards or screen readers [6][1]. Provide multiple ways for learners to demonstrate their understanding [5][2]. This flexibility allows individuals to utilize their strengths while navigating any limitations. Low-pressure assessments, such as "exit tickets" or "muddiest point" reflections, can highlight areas where learners need additional help without the stress of formal grading. For hands-on tasks, offer tiered levels of support to meet the needs of all participants.
Offering Different Learning Formats
Delivering content through various formats - such as text, audio, graphics, and video - helps learners connect concepts across different mediums [2][6]. Staying true to inclusive design principles, these options ensure all learners can access the material. For video content, include human-transcribed captions and text transcripts. For audio-only materials, provide accurate transcripts [2][6]. If a video contains visual-only information, add an audio description track to make it accessible [4][1].
Distribute materials in advance to assist learners using adaptive technologies [4][6]. Use flexible file formats like HTML, Word, or EPUB, which allow users to adjust font size, colors, and spacing. Avoid relying solely on PDFs, as they can be challenging for screen readers and those with low vision [4][2]. Recorded lectures and asynchronous activities also support learners in different time zones or those with unreliable internet access [2]. To improve user experience, ensure media doesn’t autoplay when navigating to a slide - let participants choose when to engage by clicking a play button [1].
"Sessions that are accessible to people with disabilities are also inclusive to many more audiences. For example, people with different learning styles and people who are not fluent in the language."
– W3C Web Accessibility Initiative [4]
Accessibility Standards and Technical Requirements
WCAG 2.2 Accessibility Requirements for Inclusive Training Design
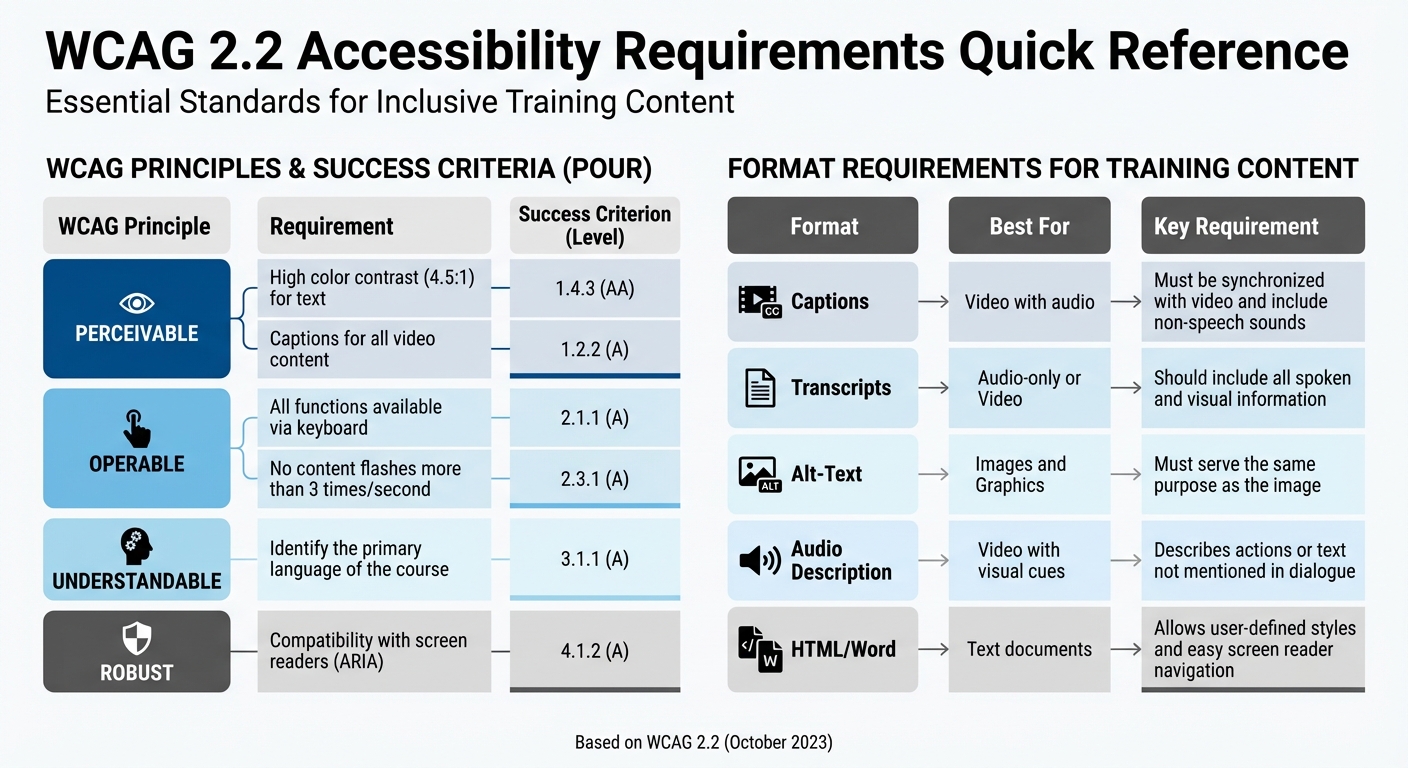
Ensuring technical compliance with WCAG 2.2 is essential for creating training content that is accessible to everyone. WCAG 2.2, introduced in October 2023, serves as the latest standard, and content meeting its criteria also aligns with earlier versions (2.1 and 2.0) [15]. These guidelines are built on four key principles, collectively known as POUR: content must be Perceivable (accessible to the senses), Operable (usable by all), Understandable (clear in presentation), and Robust (compatible with a variety of devices and assistive tools) [15][16].
Following WCAG Guidelines
Start with the basics to make your content more accessible. For images, icons, and buttons, provide descriptive alternative text - except for decorative images, which should use an empty alt attribute (alt="") [16][6]. Color contrast is another critical factor: standard text must have a contrast ratio of at least 4.5:1, while large text (18pt or larger, or 14pt bold) requires a minimum of 3:1 [16][2].
Interactive elements like quizzes, navigation buttons, and video controls must be fully functional with a keyboard [16][1]. Test this by navigating using only the Tab, Enter, and arrow keys. If any element is inaccessible, it will likely be a barrier for learners too. Similarly, captions and transcripts are non-negotiable. All prerecorded and live videos must include synchronized captions, and audio-only materials like podcasts require detailed transcripts [16][1].
Navigation should feel intuitive and consistent. Elements repeated across slides or pages, such as navigation menus, should always appear in the same order to avoid confusion [16][1]. If learners make errors, such as entering incorrect information in a quiz, the system should clearly identify the mistake in text and provide guidance on how to fix it [16][1]. Your training content should also remain functional when zoomed to 200%, and ideally up to 400%, without losing clarity or usability [16].
| WCAG Principle | Requirement | Success Criterion (Level) |
|---|---|---|
| Perceivable | High color contrast (4.5:1) for text | 1.4.3 (AA) |
| Perceivable | Captions for all video content | 1.2.2 (A) |
| Operable | All functions available via keyboard | 2.1.1 (A) |
| Operable | No content flashes more than 3 times/second | 2.3.1 (A) |
| Understandable | Identify the primary language of the course | 3.1.1 (A) |
| Robust | Compatibility with screen readers (ARIA) | 4.1.2 (A) |
Once your content meets WCAG standards, focus on integrating assistive technologies to further enhance the learning experience.
Supporting Assistive Technologies
Designing for assistive technology requires careful planning. Use proper HTML markup for headings, lists, and sections to ensure screen readers can navigate your content in a logical order [16][1]. Every interactive feature - such as buttons, links, and form fields - needs a programmatically defined name, role, and value so assistive tools can relay their purpose to the user [16][17]. ARIA labels are crucial for communicating the function and state changes of these elements to screen readers.
Focus management is another essential aspect. Maintain a logical tab order, and when new content like a modal window opens, shift the focus to that element immediately [16][1]. Include "skip to main content" links at the top of each page, allowing users to bypass repetitive menus [16][1]. Avoid vague language like "click here" in instructions; instead, use more inclusive terms like "select" or "activate" since not all users rely on a mouse [6].
"Assistive technologies are software or equipment that people with disabilities use to improve interaction with the web, such as screen readers that read aloud web pages for people who cannot read text... and voice recognition software... for people who cannot use a keyboard or mouse."
– W3C Web Accessibility Initiative [4]
Before launching your training, test it thoroughly with multiple screen readers and by navigating using only a keyboard [1]. Try experiencing the course with your eyes closed or the screen turned off to simulate the experience of a blind learner. Provide clear instructions upfront on how to use accessibility features, including keyboard shortcuts [1]. Additionally, remember that content shared during remote meetings via screen sharing is often inaccessible to assistive technology users - always distribute materials directly to participants beforehand [4]. These practices ensure your training can reach a diverse audience.
Delivering Content in Multiple Formats
Offering content in various formats provides learners with greater flexibility. Use adjustable document formats like HTML, Word, or EPUB, which allow users to modify font size, colors, and spacing to suit their needs [4][14]. PDFs, while common, can pose challenges for individuals with low vision or cognitive disabilities, so avoid relying on them as your sole format [4][14]. If you must use PDFs, ensure they are properly tagged and structured for screen readers.
Employ semantic structure throughout your materials. Use built-in styles for headings, lists, and tables so assistive technologies can interpret the content logically [12][14]. Each slide or page should have a clear, descriptive title to help screen reader users navigate efficiently [6][1]. For images and graphics, provide alternative text that conveys the same purpose as the visual. Keep alt text under 125 characters, as some screen readers may truncate longer descriptions [14]. For complex visuals, include detailed descriptions in the main text.
During live or recorded presentations, describe all relevant visuals verbally. For instance, instead of relying solely on a visual cue, say, "About half the audience raised their hands." For videos with important visual details not covered in the dialogue, include an audio description track or a detailed transcript [16][6]. Additionally, avoid autoplaying audio or video content, as this can interfere with screen reader functionality [1].
| Format | Best For | Key Requirement |
|---|---|---|
| Captions | Video with audio | Must be synchronized with the video and include non-speech sounds [16] |
| Transcripts | Audio-only or Video | Should include all spoken and visual information [16][4] |
| Alt-Text | Images and Graphics | Must serve the same purpose as the image [14] |
| Audio Description | Video with visual cues | Describes actions or text not mentioned in dialogue [16][6] |
| HTML/Word | Text documents | Allows user-defined styles and easy screen reader navigation [4] |
sbb-itb-8feac72
Assessment and Feedback Methods
Inclusive training relies on fair evaluations that reflect the diverse abilities of learners while addressing potential biases. Effective assessments should measure individual skills and knowledge without comparing learners to their peers. Biases related to gender, race, ethnicity, or disability can distort evaluations [18]. To ensure fairness, assessments should focus on observable abilities rather than subjective factors like personality or effort [18]. These strategies align with inclusive teaching practices, helping to accurately gauge mastery.
Offering Flexible Assessment Options
When it comes to evaluations, offering flexibility is key. Allow learners to demonstrate their understanding through various formats such as written essays, presentations, podcasts, portfolios, or even artistic projects [5][19]. According to Stanford Teaching Commons, rubrics should be "format-neutral", meaning they can be applied equally across different types of submissions, whether it's a written report or a verbal presentation [2]. Frequent, low-stakes assessments can also help reduce stress while providing a more accurate picture of progress [2].
Time accommodations are another important consideration. Removing time limits or offering extended options ensures all learners have a fair chance to succeed [1]. If time constraints are unavoidable, provide alternatives: unlimited time, extended durations (e.g., 2x or 4x the standard time), or even allow learners to set their own limits [1]. Anonymous grading features in Learning Management Systems can help minimize unconscious bias, promoting more objective evaluations [5]. Additionally, "oops tokens" or late passes can offer students flexibility in emergencies without requiring them to share personal details [5].
| Inequitable Practice | Equitable Alternative |
|---|---|
| Grading on a curve | Grade based on mastery of course objectives [5] |
| High-stakes, single-format exams | Allow multiple submission formats (e.g., video, text) [5] |
| Using "muted language" for some groups | Use consistent, positive language for all students [18] |
| Commenting on personal life or family | Focus only on professional behaviors observed [18] |
Giving Constructive Feedback
After assessments, constructive feedback helps learners grow. The "Where to Next?" model is an effective approach: identify the Issue, explain its Relevance, and suggest an Action [20]. For instance, instead of vague comments like "Needs work", you could say: "This sentence might confuse readers (Issue). Clear communication is required for a general audience (Relevance). Reword this sentence to make your meaning clear (Action)" [20].
Feedback should also convey high expectations paired with confidence in the learner's abilities. The Center for Transformative Teaching at the University of Nebraska suggests using statements like:
"I have very high standards, but I know you can meet them." [5]
This approach reassures students that feedback is meant to guide improvement, not judge their abilities. Always tie feedback to the rubric to clarify grading decisions [5][20]. Focus on one or two key areas for improvement to avoid overwhelming students [20]. Deliver feedback promptly - ideally before the next assignment - so learners can apply what they've learned [5][20]. To ensure accessibility, avoid using PDFs; instead, provide feedback in Word or HTML formats. Use clear, straightforward language, steering clear of jargon or idioms that might confuse non-native speakers or those with cognitive challenges [6][4].
Additionally, avoid referencing a student's disability or accommodations in written feedback. UCSF Medical Education guidelines emphasize:
"Written comments about student performance should not make any reference to a person's accommodations or disability status." [18]
Maintaining privacy in feedback is crucial.
Providing Extra Time and Support
To support accessibility, include pauses between topics to give learners time to process information and formulate questions [4]. Accept electronic submissions for all assignments, enabling the use of assistive tools [19]. For interactive assessments, ensure features like online polls or virtual "sticky notes" are compatible with screen readers or keyboard navigation. Always provide an accessible alternative [4][1].
Annotated examples of past work can help clarify expectations and provide a benchmark for strong performance [5]. Self-assessment opportunities encourage learners to reflect on their work before receiving instructor feedback, fostering critical thinking and self-awareness [21][19]. Mid-semester "Keep/Stop/Start" surveys allow students to share feedback on teaching methods, building trust and enabling adjustments as needed [5].
Accommodations and Support Systems
Creating support systems early and responding quickly to learners' needs ensures everyone can fully participate, regardless of physical or mental health challenges.
Addressing Physical and Mental Health Needs
During registration, ask about specific accessibility needs, such as break schedules or access to session recordings [4]. Pre-course surveys can also help uncover learners' knowledge levels, interests, and any obstacles to their learning [5].
For cognitive support, keep slide designs consistent, start sessions with an overview, and wrap up by reviewing key points to ease cognitive load [4]. During Q&A sessions, allow extra time for learners with cognitive disabilities to process and respond [4].
Handle accommodation requests with confidentiality. Stanford University highlights the importance of privacy:
"If/when a person with a disability requests an accommodation and/or discloses their disability, it is important to remember that these discussions should occur in private and should only be shared with those that need to know these details." [22]
Keep an eye on participation and reach out to learners who miss assignments or sessions [5]. Promote help-seeking as a sign of motivation and share resources for wellbeing regularly [5].
These practices create a health-aware learning environment with clear accommodation procedures.
Setting Up Accommodation Request Procedures
Clear procedures make it easier for learners to request support. Include an accessibility statement with contact details, such as: "Contact X at phone Y or email Z, requests by [date]" [22].
Set a deadline - at least a week before training starts - for accommodation requests to allow time for planning [22]. Provide instructions for accessibility before learners access an eCourse, ensuring they can navigate it without barriers [1].
If captioning is needed, hire a professional captioner instead of relying on auto-captions to ensure accuracy [22]. Additionally, create alternate versions of eCourses that offer the same information in case the primary version is inaccessible [1]. The University of Nebraska-Lincoln advises:
"Never ask if students 'really' need accommodations." [5]
The focus should always be on meeting needs, not questioning them.
Early and clear procedures lay the groundwork for continuous support.
Providing Follow-Up Support
Once accommodation procedures are in place, ongoing follow-up ensures learners feel supported throughout their training. Schedule brief check-ins with learners to provide personal attention and reduce isolation [2]. Use Learning Management System tools to track attendance and assignments, reaching out to those who might be struggling [5].
Mid-training feedback is invaluable. The University of Nebraska-Lincoln suggests a simple survey after the first assessment:
"A simple mid-semester survey asking '1) What should I keep doing, 2) What should I stop doing, 3) What should I start doing' shortly after the first assessment can help you notice and correct problems before the end of the semester." [5]
To help learners navigate challenges, consider creating a "wisdom wall" where past participants share advice and strategies [5]. Provide clear contact information for reporting unexpected accessibility or technical issues [6]. Establish procedures for extensions or makeup work in case of health or personal emergencies. Always have a fully accessible alternate version of the training ready to deploy if technical barriers arise [1][6].
Stakeholder Engagement and Testing
After setting up a solid course design and ensuring accessibility, the next step is engaging stakeholders. This ensures your training program is practical and genuinely inclusive. To achieve this, it’s essential to involve the people who will actually use the training. By bringing in diverse voices early and testing with real users, you can catch potential barriers before they become an issue.
Including Different Voices in Design
Start by identifying the key stakeholders who should be involved. These include learners from underrepresented backgrounds, such as first-generation students, international participants, and individuals with disabilities (visual, hearing, mobility, or cognitive) [5][4]. Additionally, involve support offices like disability service providers, instructional designers, and digital accessibility experts [5][22].
Gathering input is crucial, and pre-training assessments can help. These assessments should ask about participants’ knowledge levels, interests, and specific needs, such as time zone considerations [5][2]. Keep in mind that needs can vary widely, so it’s important to design surveys that capture a broad range of accommodation requests.
Collaborate with instructional designers early in the process to address equity challenges and apply Universal Design for Learning principles [5]. For global training programs, include participants from various countries to identify potential issues, such as government restrictions on certain tools or data [2].
Testing with Different User Groups
Before launching your program, conduct manual testing to catch issues automated tools might miss [1]. Test interactive features like polling, chat functions, and reactions to ensure they work seamlessly with keyboard navigation and screen readers [22]. Also, verify that all element states (hover, active, selected, visited) meet the 4.5:1 color contrast ratio for text [1].
Go beyond basic testing by "stress testing" the program. For example, try using seekbars, navigating away from slides prematurely, or revisiting content through menus. This ensures custom programming remains functional and accessible [1]. Replace vague instructions like "click here" with clear, descriptive language such as "activate" for users who don’t rely on a mouse [6]. Additionally, provide source files (like .docx or .pptx) alongside PDFs so users can adjust formats to suit their needs [22][4].
Testing should include participants with various disabilities to uncover potential barriers [4]. If any barriers prove insurmountable, prepare a fully accessible alternative version that delivers an equivalent learning experience [1]. Use the insights from these tests to refine your feedback and improvement processes.
Collecting Regular Feedback
Feedback shouldn’t be treated as a one-time task. The University of Nebraska-Lincoln suggests using a simple mid-training survey to identify and address issues early:
"A simple mid-semester survey asking '1) What should I keep doing, 2) What should I stop doing, 3) What should I start doing' shortly after the first assessment can help you notice and correct problems before the end of the semester." [5]
In addition to surveys, schedule short one-on-one check-ins with participants to address individual challenges, especially for those in different time zones or online formats. A digital feedback board can also encourage peer-to-peer insights [2][5]. Use your Learning Management System to monitor attendance and assignments, and reach out to participants who may be struggling [5].
It’s also important to provide a clear way for participants to report unexpected accessibility issues during the training [6]. After gathering feedback, share the results with participants and explain the reasoning behind any changes - or lack thereof - to build trust [5].
| Feedback Stage | Method | Purpose |
|---|---|---|
| Pre-Training | Pre-course surveys / Registration forms | Identify prior knowledge and accommodation needs [5][4] |
| During Training | Mid-semester "Keep/Stop/Start" surveys | Address issues before the program ends [5] |
| During Training | 1-on-1 short meetings | Reduce isolation and address personal barriers [2] |
| Post-Training | Wisdom Walls | Gather peer advice for future improvements [5] |
| Continuous | Dedicated contact email/form | Allow real-time reporting of accessibility issues [6] |
Conclusion
Inclusive training design is a journey that grows and adapts to meet the diverse needs of learners. As Stanford University Teaching Commons emphasizes:
"Effective education is accessible: all students should be able to access the materials they need for learning" [2].
This idea extends far beyond accommodating disabilities. It includes international learners, first-generation students, and individuals with varied learning styles or circumstances.
The checklist provided earlier offers practical steps for creating inclusive training at every stage. From setting clear learning objectives and eliminating bias to adhering to WCAG guidelines and offering flexible assessments, it’s a roadmap for thoughtful design. But the real challenge begins post-launch. Use learner feedback to refine your program continuously [5]. When you make an adjustment for one individual, consider making it a permanent feature so future participants benefit as well [5].
Accessible design strategies - like consistent layouts, plain language, and varied content formats - help reduce cognitive load. Simple measures, such as maintaining a 4.5:1 contrast ratio and using descriptive visuals, ensure materials work for everyone [2][4][5].
Flexibility is key. Stay prepared to meet the needs of new participants, even when those needs weren’t disclosed upfront. Clear reporting channels allow learners to highlight any unexpected barriers [6]. Regularly reviewing updated frameworks, such as the UDL Guidelines 3.0, can help address systemic challenges and biases [3].
Think of this checklist as a dynamic resource. As CAST reminds us:
"The UDL Guidelines are a living, dynamic tool that is continuously developed based on new research and feedback from practitioners" [3].
Your training program should embrace the same mindset - always evolving to better serve its learners.
FAQs
What steps can I take to make my training materials accessible to everyone?
To ensure your training materials are accessible to everyone, prioritize inclusivity in your design. Start by using clear, high-contrast fonts to improve readability, and always include descriptive alternative text for images to support visually impaired learners. Offering your content in various formats - like text, audio, and visuals - helps cater to different learning styles and sensory needs. Don’t forget to caption videos and provide transcripts for audio materials to assist those with hearing impairments.
Apply universal design for learning (UDL) principles by giving learners flexible ways to interact with the material and show their understanding. Make sure the digital tools and platforms you choose are easy to navigate and meet accessibility standards. These steps help create a learning environment that welcomes and supports a wide range of abilities and preferences.
What are the key steps to designing an inclusive and accessible syllabus?
Designing a syllabus that welcomes and supports every student is key to creating an accessible learning environment. Start with clear, straightforward language to explain course expectations, resources, and policies. This approach helps ease any initial anxiety and ensures students feel confident and prepared.
Include specific details about the course, like an overview of the content, communication guidelines, and information on support services, such as accommodations for disabilities. To make the syllabus more engaging and easier to navigate, define any unfamiliar terms and consider adding visuals - icons, charts, or even a photo of the instructor can make the document feel more approachable.
Most importantly, keep the tone inviting and emphasize resources that promote equity and inclusion. These steps can set a positive tone for the course and help create a supportive learning environment for everyone.
How can I make my training content more inclusive and representative of diverse perspectives?
Building training content that feels inclusive starts by weaving in diverse perspectives and examples. By showcasing a variety of cultural, social, and experiential viewpoints, you help learners from different backgrounds feel seen and appreciated.
Another key step is to design materials that cater to different ways of learning. This could mean offering content in multiple formats - like text, audio, and visuals - so learners can engage in the way that works best for them. Similarly, giving learners options for demonstrating their knowledge, such as through written assignments, presentations, or hands-on projects, ensures everyone has a fair shot at success.
Lastly, make it a habit to review your content with a critical eye. Look for and eliminate biases, including stereotypes or language that might exclude or marginalize. Aim to create training materials that not only respect but celebrate the rich diversity of identities, fostering a learning space where everyone feels they belong.