
Checklist for Integrating User Story Mapping in Sprints
User story mapping helps agile teams visualize the user journey, prioritize tasks, and align sprints with user needs. This method, introduced by Jeff Patton in 2008, organizes workflows into a clear structure: the horizontal "backbone" represents the user's journey, while the vertical axis prioritizes tasks. Here's a quick checklist to integrate user story mapping into your sprints:
- Assemble a Cross-Functional Team: Include product managers, developers, designers, and other roles to balance perspectives. Keep the group under 10 participants.
- Define User Personas and Activities: Focus on user goals and map activities chronologically to reflect their journey.
- Review Sprint Backlog and Roadmap: Compare tasks with the user journey to identify gaps and dependencies.
- Build the Backbone: Lay out high-level user activities in order, then break them into prioritized tasks and stories.
- Set Acceptance Criteria: Define clear, testable conditions for each story to ensure alignment with user goals.
- Plan Sprints and Releases: Use the map to prioritize stories, split them into sprints, and define MVP and future releases.
- Track Progress During Sprints: Use the map in daily standups, update it regularly, and check tasks against user needs.
- Iterate After Sprints: Refine the map during retrospectives based on feedback, metrics, and user data.
User story mapping keeps teams focused on delivering meaningful outcomes while maintaining a clear connection to user needs. By following this process, you can streamline sprint planning and execution.
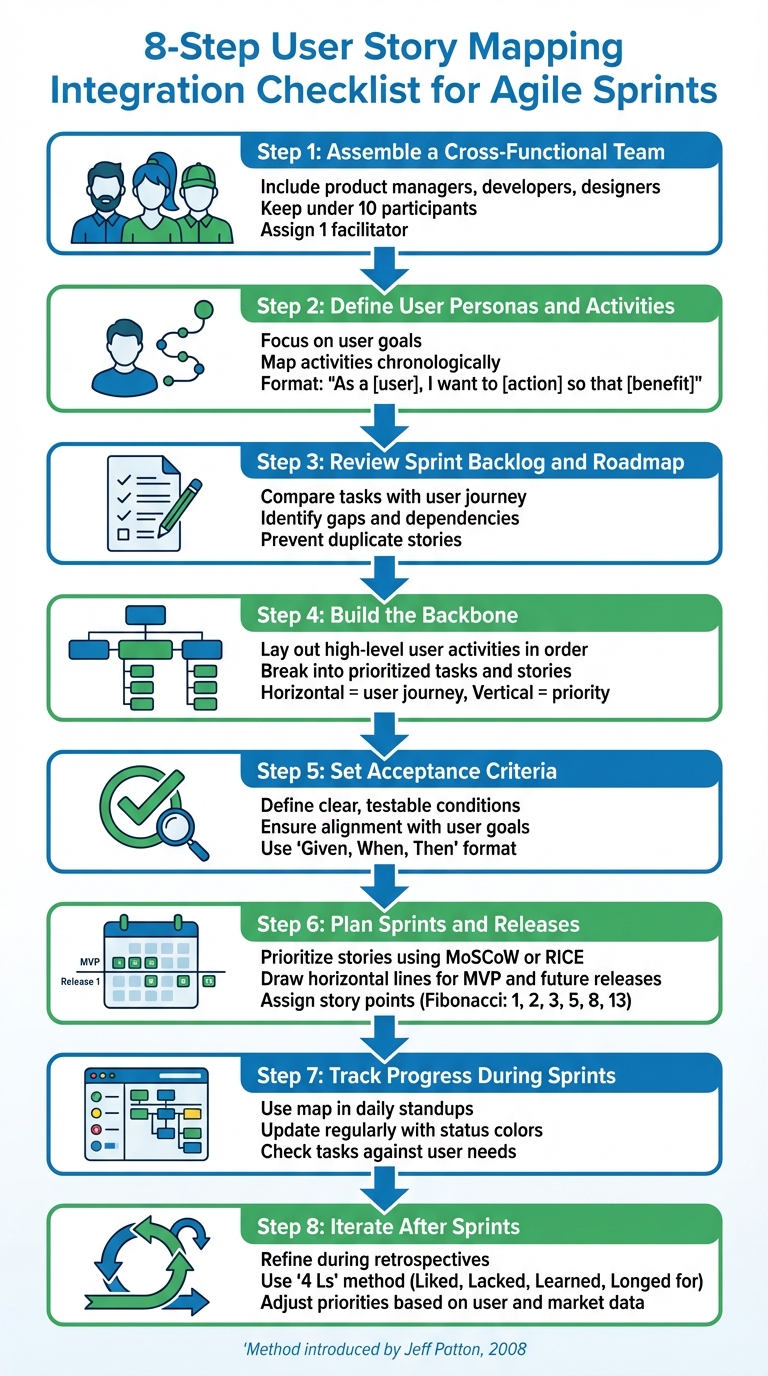
8-Step User Story Mapping Integration Checklist for Agile Sprints
User Story Mapping Tutorial (How to create, read, and use story maps)
Preparation Checklist
Set up a clear plan to align your team and avoid wasting time.
Assemble a Cross-Functional Team
Bring together a diverse group, including product managers, developers, UX/UI designers, and testers, to balance technical feasibility with a great user experience. Add customer-facing roles like sales, marketing, and support to incorporate direct user insights. Specialists from operations, IT, finance, or legal can address dependencies and compliance issues early on.
Keep the team small - under 10 participants - to ensure focus and meaningful contributions. This mix of perspectives helps create a strong foundation for smooth sprint integration. Assign a single facilitator, such as a Scrum Master or an external product manager, to guide the session without the distraction of other responsibilities. As Nicholas Muldoon, Co-Founder of Easy Agile, puts it:
User story mapping is a facilitated, curated conversation that brings everyone along for the journey. It's an opportunity for the product manager to brain dump their insights... and get it into the minds of the team who are about to deliver on it [5].
Plan for 2–3 hour sessions spread out over several days to avoid burnout and maintain focus.
Define User Personas and High-Level User Activities
Identify your main user types, focusing on their skills, goals, and challenges. Use a simple format to frame your product vision: "As a [type of user], I want to [action] so that [benefit]." This approach keeps the team focused on delivering real value, not just building features.
For example, in February 2025, BakeTech founder Emma used this method to bridge gaps between designers and developers. The team created a persona named "Rebecca", a busy bakery owner aiming to get her product catalog online to streamline ordering. They outlined key activities like "Add Products", "Organize Products", and "Set Pricing." These steps formed the core of their story map, helping them prioritize a minimum viable product (MVP) with manual uploads before tackling advanced features like automated syncing [3].
Map these activities chronologically from left to right to mirror the natural user journey. Focus on user actions like "Share preferences" instead of system functions like "Train the AI" [2]. This approach ensures the story map stays user-centered and practical.
Review Existing Sprint Backlog and Product Roadmap
Before diving into story mapping, take a close look at your current sprint backlog and product roadmap. Flat backlogs often lack context about the user journey. Reviewing them helps you connect tasks to the bigger picture and spot how they fit into the overall customer experience.
Compare backlog items with the user journey to uncover gaps, overlaps, and dependencies. Flag tasks that don’t clearly improve the user experience. This step prevents duplicate stories and makes it easier to integrate your visual map into development tools. Use the roadmap to focus on solving specific customer problems or "jobs to be done", rather than letting the session devolve into a feature brainstorming exercise. As Aha! Labs explains:
The story map gives you the ability to envision, upfront, the potential issues that may slow you down later, such as bottlenecks, dependencies, requirements, or missing information [7].
With these steps complete, you're ready to build a user story map that truly reflects your users' needs and sets your team up for success.
Creating the User Story Map
Mapping out user journeys helps you visualize your product's workflow and understand how users interact with it.
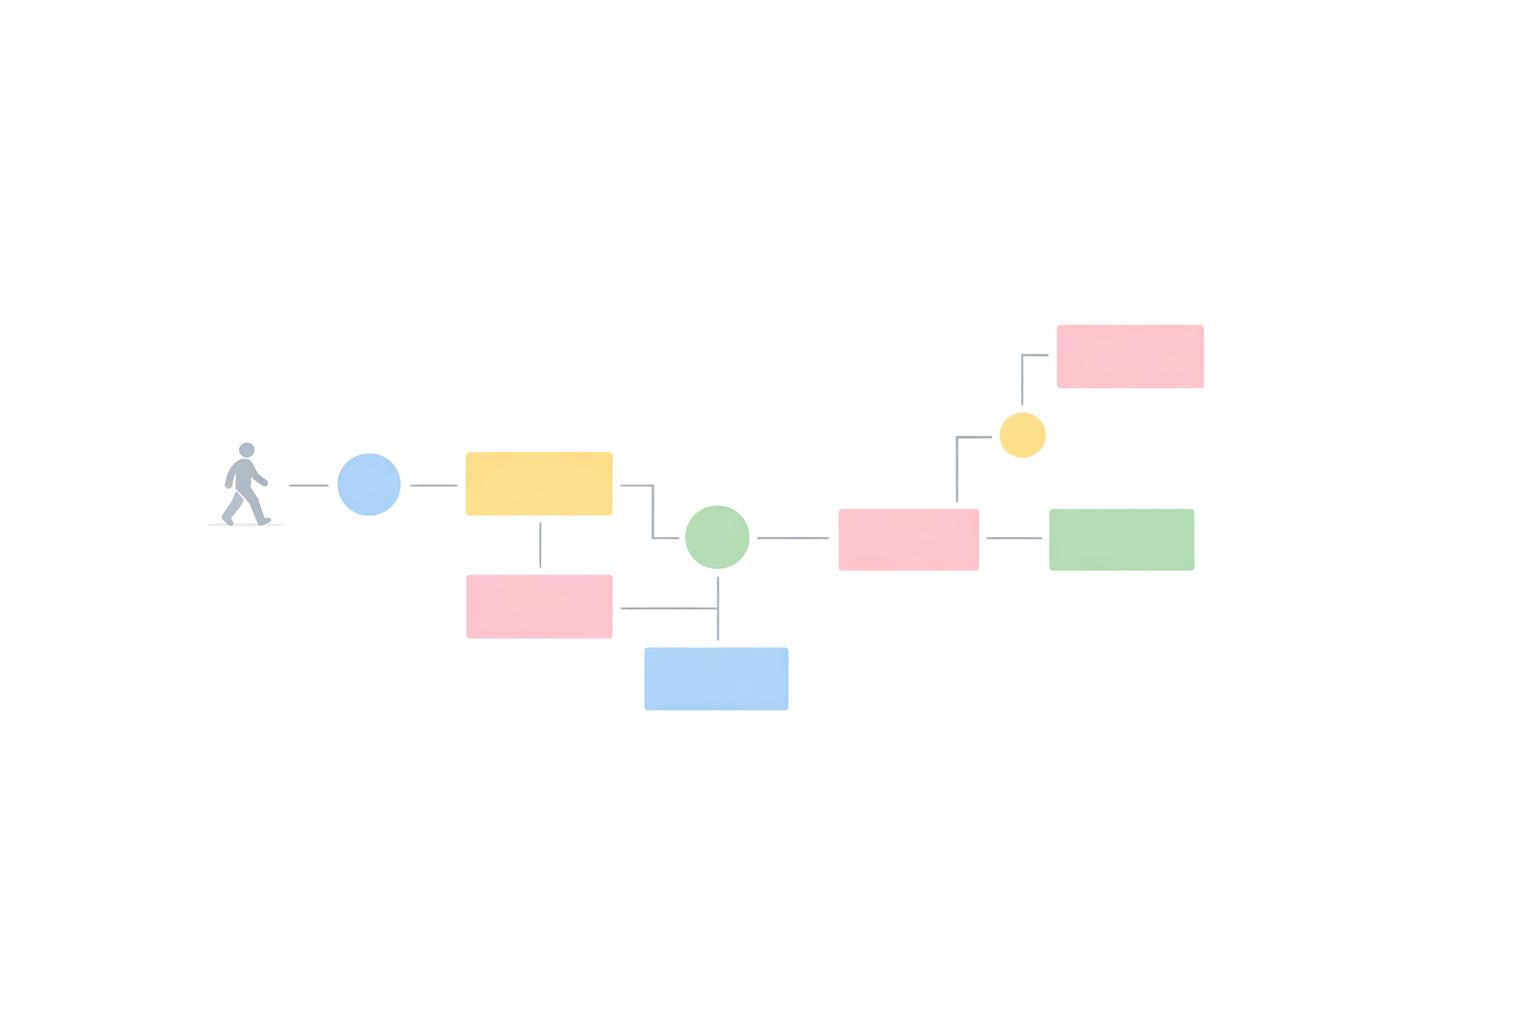
Build the Backbone with User Journeys
Start by arranging high-level user activities - often called "epics" or "themes" - horizontally across the top of your map. These activities should be ordered chronologically, left to right, to form the backbone of your user story map. Each activity represents a key step a user takes to achieve their goal, following the natural flow through your product.
Keep these backbone items concise and action-oriented. Use short, descriptive phrases like "Submit Expense Report" or "Review Order History." A good backbone should read like a story when you connect the steps with "then." For example: "User logs in, then searches for a product, then adds to cart."
Focus on one persona at a time to maintain clarity. Once the backbone is laid out, review it with your cross-functional team to identify any missing steps or areas of confusion. This backbone not only outlines the user journey but also provides context for team members working on individual steps. After solidifying the backbone, you can move on to breaking down each step into detailed tasks and stories.
Break Down Activities into User Tasks and Stories
Underneath each backbone activity, list the specific tasks and user stories in a vertical column. Prioritize these items, placing "must-have" tasks at the top and lower-priority ones further down. Each story should be written using a consistent format, such as:
"As a [persona], I want to [action] so that [benefit]."
To keep stories manageable, ensure they can fit within a sprint. Use horizontal lines to group stories into releases or sprints, which helps identify your minimum viable product (MVP). Once tasks and stories are outlined, establish clear acceptance criteria for each one.
Define Acceptance Criteria for Each Story
Acceptance criteria are the testable conditions that determine when a story is complete. These criteria act as the "Definition of Done" for each story, ensuring everyone on the team understands the value being delivered. Focus on the user's perspective when defining these criteria, rather than listing technical tasks.
Collaborate with developers, testers, and UX designers to create criteria that are both user-focused and technically achievable. If a story feels too large, use the acceptance criteria to find logical points for splitting it into smaller, more manageable pieces. This approach keeps the team aligned on delivering measurable value to users. Once the acceptance criteria are finalized, integrate the stories into your sprint plans to maintain a clear connection to user goals.
Integrating the Story Map into Sprints
Tie your story map directly into your sprint workflows to ensure it drives daily progress. Here’s how to align your user story map with sprint execution effectively.
Prioritize Stories and Break Them into Sprints
Leverage the vertical axis of your story map to rank stories based on their business value and user impact. Place the most critical features - those forming your Minimum Viable Product (MVP) - at the top. Features with lower priority can sit further down the map. To make prioritization more objective, consider using frameworks like MoSCoW or RICE.
Next, draw a horizontal line across the map to separate items for the current sprint from those assigned to future iterations. Each slice above the line should represent a functional, end-to-end increment that delivers clear value to users. To ensure nothing is overlooked, have a team member "walk through" the map from the perspective of your target persona, checking for dependencies or gaps [8][4]. This approach feeds directly into sprint planning.
Assign Story Points and Assess Team Velocity
Estimate the effort for each story using Fibonacci-based story points (e.g., 1, 2, 3, 5, 8, 13). Assign lower points to simple tasks (1–2) and higher points to more complex features (5–8). This relative sizing helps ensure the workload aligns with your team’s capacity.
To calculate your team’s effective capacity, use this formula: (Number of Team Members × Working Hours × Sprint Days) × Focus Factor. For example, a team of five working 8-hour days over a 10-day sprint with a 0.8 focus factor yields 320 effective hours [9]. The focus factor (commonly between 0.6 and 0.8) accounts for interruptions, meetings, and other non-coding activities. Alan Zucker, Founding Principal at Project Management Essentials, emphasizes:
The best way to estimate a team's capacity is based on its historical performance. In other words, how many story points they completed in the last several iterations [9].
Plan Release Cut Lines Using the Map
Add horizontal lines to your story map to define release boundaries beyond the immediate sprint. The first cut line indicates your MVP - the essential stories that allow users to achieve their primary goal. Additional lines can represent future releases, like Release 1.1 or Release 2.0. This visual roadmap keeps the team focused on current tasks while offering a clear view of upcoming iterations.
To streamline the process, link your digital story map to tools like Jira or Trello. Backbone items can translate into epics, while detailed tasks become user stories [1][6][2]. This integration ensures your map stays updated and actionable.
sbb-itb-8feac72
Execution and Tracking
When your sprint kicks off, the story map becomes the go-to tool for tracking progress and staying aligned with user goals. Unlike a traditional flat backlog that can obscure the bigger picture, a story map gives your team a clear, visual overview of the delivery schedule. This makes it easier to see progress at a glance and sets the tone for focused daily discussions.
Use the Map During Daily Standups
Make the story map a key part of your daily standup meetings to keep the team centered on the overall user journey rather than getting lost in isolated tasks. As Nick Muldoon, creator of Easy Agile User Story Maps, puts it:
A story map is a visual representation of the journey a customer takes with a product, including activities and tasks they complete [10].
During standups, use the map to address blockers and show how current tasks fit into the bigger picture. If a task is delayed, mark it to highlight potential downstream effects. If new functionality or subtasks come up, add them directly to the map using a shared digital platform to ensure it stays up-to-date.
Keep the Map Updated
Throughout the sprint, regularly update the story map to reflect progress. Use clear status indicators - like yellow for "in progress" and green for "done" - to make it easy to see where things stand. This offers stakeholders visibility without requiring them to dig into every single card. If new constraints or insights arise, adjust the map in real time by reprioritizing stories, moving less urgent ones below the current release line.
Check Stories Against User Goals
As you update progress, take time to confirm that each completed story meets user needs. Before marking a story as complete, ensure it satisfies the acceptance criteria defined on the story card or in your digital tool. These criteria, often written in the "Given, When, Then" format, act as measurable standards for success. Periodically review the map from the perspective of your user persona to confirm that completed stories contribute meaningfully to the user journey and that no critical steps have been missed.
Review and Iterate
After each sprint, take time during retrospectives to revisit and refine your story map. As Anna Kaley, Senior User Experience Specialist at Nielsen Norman Group, explains:
It's far easier to swap out sticky notes than it is to revise hefty requirements documents [2].
Use this opportunity to update your map by adding features you may have missed, removing outdated elements, and reordering stories based on user feedback and technical considerations. These adjustments help prepare your team for focused discussions in upcoming retrospectives.
Incorporate Feedback During Sprint Retrospectives
Retrospectives are a great chance to review your story map with a user-centric lens. Ask targeted questions like, "What mistakes might a user make here?" or "What could confuse users at this point?" [8]. You can also use structured methods like the "4 Ls" (Liked, Lacked, Learned, Longed for) to pinpoint areas where features or tasks need to be added or improved [11]. If your team conducted research spikes or gathered user feedback during the sprint, incorporate those findings to adjust both technical feasibility and user priorities [1].
To keep everything aligned, ensure that updates to your story map - whether physical or digital - are reflected in your flat backlog tools, like Jira or Trello. This avoids duplication and ensures a single source of truth for your team [1][12].
Measure Completion and Evaluate Sprint Success
Use sprint metrics to evaluate team performance and refine your approach. Key metrics to track include:
- Story completion ratio: The number of stories delivered compared to those committed.
- Velocity trends: Patterns in how much work your team completes over time.
- Spill-over rate: The number of unfinished tasks carried into the next sprint [14][15].
A high spill-over rate might indicate that your stories are too large or not clearly defined, suggesting the need for further breakdown. Additionally, monitor your escaped defects count - if too many bugs are slipping through, it may be time to tighten your acceptance criteria [14]. These metrics not only measure progress but also guide improvements to your story map and sprint planning.
Refine Priorities Based on User and Market Data
Between sprints, gather insights from teams like Sales, Marketing, and Customer Support. These groups often have firsthand knowledge of user challenges and evolving market trends [3][1][13]. Use their feedback to adjust your release boundaries, shifting stories above or below the current sprint line based on new priorities [2][8].
If certain items on your map represent risky assumptions without solid data, consider replacing them with smaller experiments. Testing user reactions early can help validate ideas before committing to full development [2]. By continuously refining your priorities, you ensure that your story map stays aligned with both user needs and business goals.
Conclusion and Key Takeaways
Incorporating user story mapping into your sprints can reshape how your team plans, executes, and delivers. By following a clear process - like assembling cross-functional teams, defining the backbone, slicing releases, and refining priorities - you create a flexible roadmap that keeps everyone focused on delivering value to users.
The advantages are undeniable. Story mapping helps teams make faster progress by staying user-focused, uncovering gaps, and spotting risky assumptions early - saving valuable development time.
Your story map isn’t static; it evolves with every sprint. Use it in daily standups to visualize progress, revisit it during retrospectives to gather feedback, and adjust priorities based on actual user data. This continuous iteration keeps your team aligned with user needs and ensures your backlog remains relevant, all while maintaining focus on the bigger picture.
FAQs
How does user story mapping enhance sprint planning?
User story mapping is a powerful way for teams to lay out the user journey visually. This approach helps pinpoint key tasks, uncover any missing elements, and understand how different tasks are connected. By clearly outlining the Minimum Viable Product (MVP), it ensures sprint planning stays sharp, streamlined, and tailored to what users actually need.
Beyond that, it encourages collaboration and keeps everyone working toward the same objectives, resulting in smoother and more reliable sprint outcomes.
Who should be part of a cross-functional team for user story mapping?
A strong cross-functional team for user story mapping usually consists of a product manager, a Scrum Master, and members of the development team who handle building and testing the product. Each role contributes a distinct viewpoint, ensuring the mapping process stays aligned with the product's goals and technical possibilities.
By working together, the team develops a shared understanding of priorities, user needs, and practical steps. This teamwork makes it easier to integrate user story mapping into sprints effectively and efficiently.
How do acceptance criteria help ensure user goals are met?
Acceptance criteria outline specific, testable conditions that a user story must meet to ensure it addresses user needs effectively. By turning user goals into detailed requirements, these criteria help keep teams aligned and prevent confusion during development.
This method ensures the end product not only meets expectations but also supports user goals while maintaining consistency throughout the development process.