
How to Choose the Right Team Collaboration Software
Choosing the right team collaboration software can save time, improve communication, and streamline workflows. Here's how you can find the best fit for your team:
- Understand Your Needs: Identify where your team struggles - information silos, missed deadlines, communication overload, or too many meetings - and choose software that addresses these issues.
- Define Use Cases: Be specific about what your team needs, like sprint planning for engineering or cross-department project tracking for leadership.
- Set a Budget and Check Compliance: Costs can range from $6/user/month to much higher with add-ons. Ensure the tool meets security and compliance requirements (e.g., HIPAA, SOC 2).
- Evaluate Features: Look for essentials like messaging, task management, file sharing, integrations, and AI tools (e.g., meeting transcription). Usability and quick adoption are critical.
- Run a Pilot Test: Test shortlisted tools with real projects and gather feedback from diverse team members.
- Plan Implementation: Roll out the tool in phases with proper onboarding, training, and clear collaboration norms.
Quick Tip: Tools like Slack, Microsoft Teams, Asana, and Notion each address specific challenges. Match their strengths to your team's pain points for the best results.
10 Best Team Collaboration Tools 2025 Review
sbb-itb-8feac72
Step 1: Identify Your Team's Collaboration Needs
Before diving into tool evaluations, take a step back and figure out where your team genuinely struggles. Skipping this step can lead to wasted time and money. Spending just an hour identifying challenges upfront can save countless headaches later.
Map Current Workflow Challenges
Start by asking your team: Where does work slow down or get stuck? The answers typically fall into one of four categories: information silos, lack of visibility, communication overload, or too many meetings. Here’s a quick breakdown of these issues and the kind of tool that can help:
| Problem | Common Symptom | Tool Type Needed |
|---|---|---|
| Information Silos | Decisions are repeated; onboarding takes forever | Knowledge management (e.g., Notion, Confluence) |
| Visibility Gaps | Work is duplicated; deadlines are missed | Project management (e.g., Asana, monday.com) |
| Comms Overload | Endless email threads for simple decisions | Messaging (e.g., Slack, Teams) |
| Meeting Fatigue | Hours wasted in video calls | Async video (e.g., Loom, Slack Clips) |
You can uncover these problems through a short survey or a 30-minute team discussion. The goal is to pinpoint the biggest pain points that slow your team down the most.
"Engineering collaboration tooling looks like an ops problem until it becomes a delivery problem." - Apptension [7]
Once you identify these challenges, you’ll have a clearer picture of what your collaboration tool must address.
Define Key Use Cases
After identifying what’s not working, define the specific scenarios your tool needs to solve. Be as detailed as possible. For example:
- Does your engineering team need a shared space for sprint planning and incident response?
- Does marketing need a way to get async approval on creative briefs?
- Does leadership need a tool to track cross-functional projects across departments like Sales, Product, and Operations?
These use cases will help you separate the "must-haves" from the "nice-to-haves" when comparing tools. It’s also a good time to decide whether your team will lean toward synchronous (real-time calls and meetings) or asynchronous (written updates and recorded messages) communication. This choice will significantly influence which tools fit your team, especially if you’re distributed or hybrid.
Once your use cases are clear, it’s time to figure out your budget and compliance needs.
Set Budget and Compliance Requirements
Collaboration tools vary in cost, starting around $6/user/month and scaling up based on features and team size [5][6]. Keep in mind that these costs can add up quickly. For example, the average enterprise spends $1,840 per employee per year on collaboration tools. Worse, a 1,000-person company can lose $340,000 annually on redundant licenses alone [5].
Beyond budgeting, don’t overlook compliance. If your team works in regulated industries like healthcare, finance, or government, you’ll need to ensure the tool meets certifications such as HIPAA, SOC 2 Type II, or FedRAMP. Regardless of your field, prioritize security features like SSO/SAML, multi-factor authentication (MFA), and audit logs. Skipping this step early could lead to major issues after you’ve already invested time and resources into a tool trial.
Step 2: Build Your Evaluation Criteria
Once you've outlined your pain points and use cases, the next step is to turn those insights into a detailed checklist for comparing tools. Without clear criteria, your evaluations risk being influenced by personal preferences rather than objective needs.
Core Features to Look For
Make sure the tool you choose covers the essentials: messaging, task management, file sharing, integrations, and AI capabilities like meeting transcription and action item extraction [9][10][11]. These features directly address the challenges highlighted in Step 1, such as minimizing time wasted on sprint planning and status updates. For example:
- AI-driven task assignment now boasts 95% accuracy in matching tasks to the right team members.
- Teams using AI-assisted agile workflows report up to 40% faster release cycles.
- Engineers have been able to cut 40% of their time spent on coordination overhead [12].
While these core capabilities are critical, it's just as important to consider how well your team will adapt to the tool.
Usability and Adoption
The most powerful tool is useless if your team doesn't use it. According to SaaSRadar's 2026 report, 62% of teams are stuck with project management tools that actually hinder their productivity due to poor alignment with their needs [13]:
"The fancier the tool, the less likely your team will actually use it." - SaaSRadar Project Management Report [13]
To gauge usability, focus on two key metrics:
- Time to Productivity (TTP): This measures how quickly a new user can reach 80% of their expected task efficiency. For example, Monday.com averages 9 days, while more complex enterprise tools can take up to 24 days [13].
- Week 4 Adoption Rate: By day 28, if fewer than 70% of your team is actively using the tool, it's likely not the right fit [13].
Consider running tests with non-technical team members, as adoption rates can vary significantly across roles [13]. And remember, a tool that fits seamlessly into your existing workflows will make adoption much smoother.
Integration and Scalability
A tool that doesn’t integrate well with your current systems can create unnecessary friction. For example:
- Teams using Microsoft 365 can benefit from Microsoft Teams, which integrates natively with SharePoint and Entra ID, offering a budget-friendly solution [14].
- Mixed environments leveraging Slack alongside Google Workspace or Salesforce can take advantage of Slack’s 2,600+ app integration library, which provides exceptional flexibility [1][14].
- For workflows involving data modeling, Airtable stands out with a higher API rate limit (5 requests per second vs. Notion's 3) and a relational structure designed for technical tasks [15].
If your team is scaling beyond 50 members, features like SCIM provisioning become critical, automating user onboarding and offboarding processes [7]. And as a general rule, if a tool requires an extensive manual just to get started, it's probably more trouble than it's worth [15].
Step 3: Compare and Shortlist Tools
Best Team Collaboration Tools Compared: Features, Pricing & AI (2026)
Shortlist Tools Based on Your Needs
Using your evaluation criteria, narrow your options down to three to five tools that align most closely with your team's needs. The focus here is on solving specific problems rather than simply adding new tools. As Theo Winters, Operations Director, aptly notes:
"The fastest path to better collaboration in 2026 is not adding another tool... The fix is consolidation, not addition." [5]
Pinpoint your team's main challenge - whether it's dealing with information silos, struggling with task visibility, or managing communication overload - and pair each tool with the issue it addresses. For instance:
- Notion/Confluence: Ideal for bridging documentation gaps.
- Asana/monday.com: Boost task visibility and project tracking.
- Slack/Teams: Streamline communication and reduce overload. [5]
Also, consider how well each tool aligns with your team's preferred communication style to ensure a smoother rollout [5][17].
Take into account your team's technical proficiency as well. Tools with steep learning curves, like Jira or ClickUp, may slow adoption and limit effectiveness [16]. As Zorgle points out:
"A tool your whole team uses at 70 percent of its capability will always outperform one used by half the team at 100 percent of its capability." [4]
Once you've matched your tool options to your team's needs and technical comfort levels, it's time to dive into comparing their features and costs.
Compare Features and Pricing Side by Side
Now that you've created a shortlist, it's important to evaluate the tools side by side based on their features and pricing. Beyond the base subscription costs, account for additional charges. Many tools now offer AI-powered features as separate add-ons. For example:
- Microsoft Copilot: $30 per user/month
- Slack AI: $10 per user/month
- Notion AI: $8 per user/month
- ClickUp Brain: $5 per user/month [5]
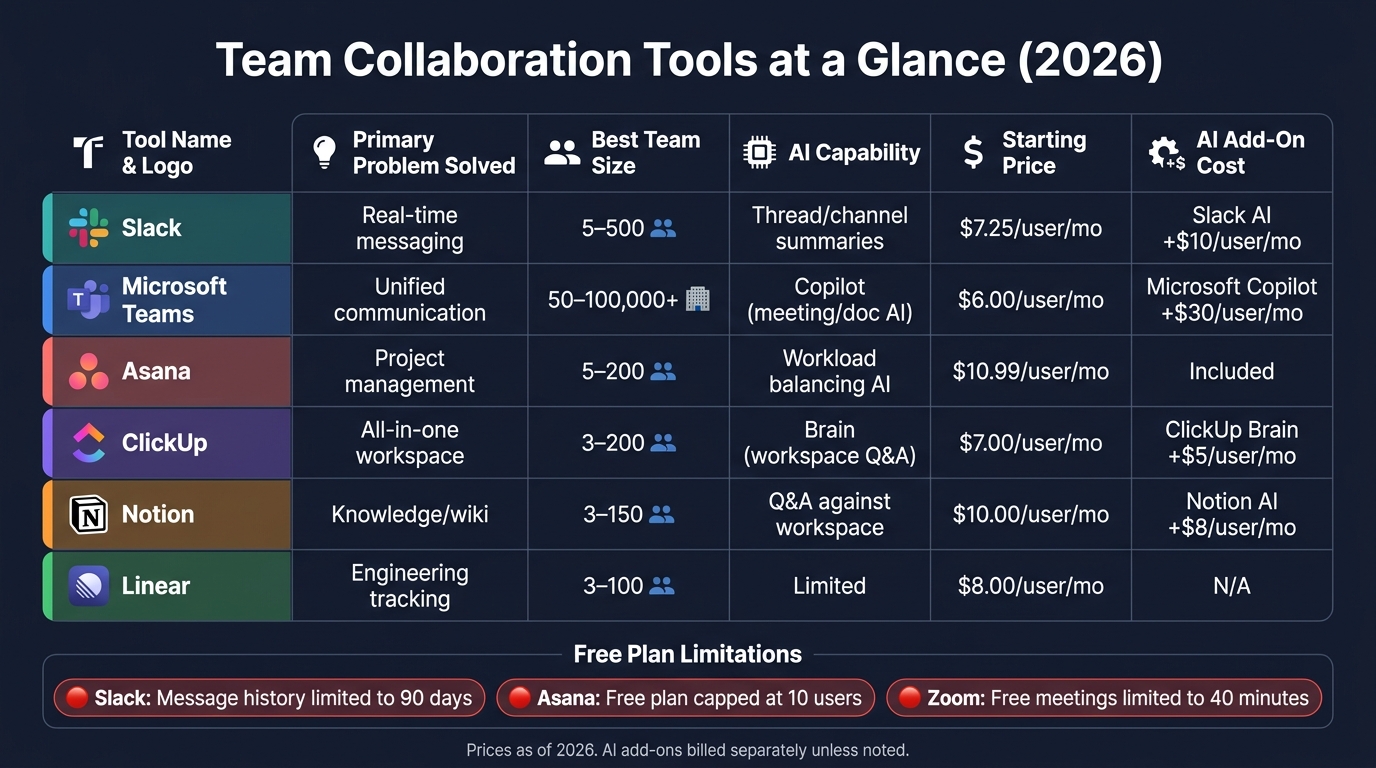
Here's a quick comparison of some popular tools:
| Tool | Primary Problem Solved | Best Team Size | AI Capability | Starting Price |
|---|---|---|---|---|
| Slack | Real-time messaging | 5–500 | Thread/channel summaries | $7.25/user/mo |
| Microsoft Teams | Unified communication | 50–100,000+ | Copilot (meeting/doc AI) | $6.00/user/mo |
| Asana | Project management | 5–200 | Workload balancing AI | $10.99/user/mo |
| ClickUp | All-in-one workspace | 3–200 | Brain (workspace Q&A) | $7.00/user/mo |
| Notion | Knowledge/wiki | 3–150 | Q&A against workspace | $10.00/user/mo |
| Linear | Engineering tracking | 3–100 | Limited | $8.00/user/mo |
Additionally, keep an eye on the limitations of free plans, as they can push you toward an upgrade sooner than expected. For example:
- Slack: Limits message history to 90 days.
- Asana: Caps free usage at 10 users.
- Zoom: Restricts free meetings to 40 minutes. [5]
Carefully weighing these factors will help you choose tools that not only meet your team's needs but also fit your budget and usage patterns.
Step 4: Run Pilot Tests and Validate Your Choice
Once you've narrowed down your options, don't rely solely on demos or feature lists to make your decision. The only way to truly understand if a tool will work for your team is by running a structured pilot test using real-world scenarios.
Design Pilot Scenarios
Start by setting up a 2–4 week pilot to gather meaningful data quickly. Make sure to use a live project - such as an active sprint, an upcoming product release, or a recurring workflow - instead of a simulated task. Real-life stakes reveal genuine challenges and friction points.
Include a diverse group of participants to ensure balanced feedback: 40% power users, 40% typical users, and 20% skeptics [21]. This mix prevents results from being skewed by overly enthusiastic early adopters. Before rolling the pilot out to the entire team, run a short "shadow pilot" (48–72 hours) with the implementation team to identify and fix any configuration issues [22].
Tailor your pilot scenarios to address your team's specific pain points. For instance:
- If your team struggles with buried information in email threads, test how well the tool surfaces past decisions.
- If tasks often get overlooked, evaluate how effectively the tool manages the "message-to-task" handoff - can a chat discussion easily become an assigned, trackable task? [3]
- If you're intrigued by AI features like meeting summaries, test their accuracy with actual team data [19].
Before starting the pilot, define clear kill-switch criteria - conditions that would justify ending the test early. Examples might include two consecutive missed milestones or vendor support issues that remain unresolved for over 72 hours [18]. These boundaries ensure the pilot remains focused and objective. Liz Flyntz, Founder & Partner at Launch Day Advisors, emphasizes this point:
"Evaluation criteria defined after proposals arrive are not criteria – they are rationalizations." [18]
Gather Feedback and Review Results
When the pilot wraps up, compare the results against your pre-set criteria to make an informed decision. Focus on key metrics like active daily users, how many tasks were successfully captured from chat, and how quickly team members resolved questions in shared channels. These numbers reveal whether the tool is being adopted and if it's solving the problems it was meant to address.
Combine the quantitative data with direct feedback from participants. Ask about their experience with navigation, mobile app reliability, and onboarding. To evaluate vendor support, submit a ticket during the pilot and assess their response time and quality [20]. This step often highlights the gap between a vendor's promises and their actual performance.
To objectively compare tools, use a weighted scorecard. For example:
- Usability: 25%
- Security: 20%
- Integrations: 15% [3]
| Pilot Metric | What It Tells You |
|---|---|
| Active Daily Users | Whether the team is actively adopting the tool |
| Task Capture Rate | How well chat discussions convert into actionable tasks |
| Time to Resolution | How quickly team members find answers or information |
| Support Response Quality | How reliable the vendor is when issues arise |
Finally, don't forget to export your data before the pilot ends. Confirm that you can retrieve your information in a clean format, such as CSV or JSON [20]. This ensures you're not locked into a tool, making it easier to switch later if needed.
Step 5: Roll Out and Refine the Solution
Your pilot is complete, and the tool has been selected - now it’s time to bring it to life. But rolling out a tool isn’t just about flipping a switch. 70% of digital workplace initiatives fail due to poor user adoption [8], so how you introduce the tool is just as important as the tool itself.
Create an Onboarding Plan
Preparation is key before the official launch. Set up SSO/MFA, configure data retention policies, and establish consistent channel naming conventions (e.g., #proj-marketing-rebrand, #dept-engineering). Next, recruit a group of internal champions - team members who will advocate for the tool, help others, and provide initial support.
Roll out the tool in phases to maintain control and avoid overwhelming the team:
| Phase | Timeframe | Focus |
|---|---|---|
| Foundation & Pilot | Days 1–30 | Release to champions, sync calendars, establish presence and availability norms |
| Integration | Days 31–60 | Migrate key files, refine document workflows, and provide training on version control |
| Scaling & Automation | Days 61–90 | Full rollout, integrate task automation, and build reporting dashboards |
For training, don’t rely on a single all-hands meeting. Instead, offer multiple formats to suit different learning preferences: live virtual sessions, on-demand Loom videos, and a written playbook. As Ron Salazar of MR2 Solutions observes:
"A tool's potential is only realized if your team actually uses it. Success hinges on a great user experience and providing the right training to ensure everyone feels comfortable and confident with the new system." [23]
Once onboarding is underway, the next critical step is establishing clear collaboration norms.
Set Collaboration Norms
Early guidance is essential for long-term success. Without clear norms, teams often fall into inefficient communication habits. Did you know that 64% of employees waste three or more hours per week due to poor collaboration practices? [5] Avoid this by documenting guidelines in a central wiki.
Define the purpose of each channel (e.g., no project decisions via random DMs), set response time expectations for each platform, and prioritize "deep work" hours by allowing delayed replies. For distributed teams, adopt an async-first approach: require written agendas for meetings and ensure every session generates notes or an AI-powered summary. Tools like Zapier can help by automatically turning chat decisions into tracked tasks to ensure nothing slips through the cracks.
With norms in place, your focus should shift to monitoring how the tool is being used and making improvements over time.
Track Usage and Improve Over Time
Once the tool is live, move your attention from activity metrics to outcomes. Instead of just counting logins, track whether projects are being completed on time, tasks are being captured from conversations, and cross-functional communication is improving. Teams with less than 40% active usage in the first 30 days are 73% more likely to abandon the tool [24].
Conduct a quarterly audit to identify issues early. Compare active users to your total licenses, deactivate unused seats, and fix broken integrations. Assign specific team members to keep documentation up to date - stale wikis are a common reason collaboration tools fall out of use. Regularly revisiting and improving the tool ensures it stays relevant and effective. By continuously tracking and refining, you’ll close the loop on implementing and optimizing your collaboration software.
Conclusion: Picking the Right Tool for Your Team
Finding the right collaboration software boils down to matching the tool to your team's specific workflow. Start by taking a close look at your processes and pinpointing pain points. A thoughtful selection process can save you from expensive mistakes down the road.
Here's a striking fact: up to 30% of purchased software licenses go unused because the tool doesn't align with how the team operates [2]. On the flip side, even if a tool is only used at 70% of its potential, it can create more value than a complex platform that only a handful of team members adopt. This highlights the importance of not just picking the right software but also ensuring your team actively uses it.
Dana Mitchell, a Collaboration Technology Analyst, explains it perfectly:
"Selecting the right collaboration platform isn't just about features - it's about enhancing workflow efficiency and fostering seamless communication that drives business outcomes." [25]
But here's the thing: technology alone isn't enough. Leadership is what makes or breaks success. Even the most advanced software won't deliver results without strong leadership to guide its adoption. For technical professionals stepping into leadership roles, the real challenge often lies in managing the human side of change, not the technical details. This is where honing non-technical skills becomes essential. Programs like Tech Leaders help professionals build the leadership, communication, and change management expertise needed to inspire collaboration and drive meaningful results.
When you combine the right tool with effective leadership, you're not just making a software choice - you're setting the stage for real productivity and long-term success. It's about turning a decision into action and ensuring your team thrives.
FAQs
How do I pick one tool when my team wants different things?
When your team has conflicting needs, selecting the right tool requires focusing on how your team works rather than simply going after trendy features. Start by examining your team’s workflows and identifying their pain points. Do they need a more structured approach for project management, or would they benefit from flexible spaces for brainstorming? Look for tools that can support both styles effectively.
To make the decision more objective, consider using a weighted scorecard. This allows you to evaluate options based on critical factors like ease of use, integration capabilities, or support for asynchronous communication. By prioritizing features that directly address your team’s biggest challenges, you can minimize friction and find a solution that works for everyone.
What should I measure in a 2–4 week pilot to decide quickly?
During a 2–4 week pilot, aim to track outcomes that show how the tool performs in everyday scenarios. Measure productivity improvements, such as cutting down meeting hours or speeding up response times. Keep an eye on adoption metrics - how quickly users onboard and how long it takes them to see value. Check for governance alignment, including security compliance and IT support requirements. Lastly, see how well the tool eases daily challenges, like minimizing context switching or reducing unnecessary admin work.
How do I avoid low adoption after rollout?
To ensure strong adoption, prioritize people over features. Start by identifying internal champions who can advocate for the tool and encourage team engagement. It's also critical to select software that fits smoothly into existing workflows and integrates easily with the systems your team already uses.
When addressing resistance, focus on clearly explaining how the tool benefits each role within the team. A phased rollout can be particularly effective - it allows you to gather feedback early and make adjustments as needed. Additionally, set clear success metrics from the beginning to track progress and measure impact.
Finally, don’t underestimate the importance of post-launch support. Allocate part of your budget to ongoing training and assistance to keep the momentum going after implementation.